Free
Pro
Astronaut
Enable BuddyNS to replicate your domain data (AXFR setup)
Goal
Have your current primary DNS server (or service) provide your domain data to BuddyNS, so BuddyNS can replicate it across its global DNS cluster.
Primary DNS server (or service)
This is the server or service where you edit your DNS entries. E.g. the server where you go to change the IP of your services, such as email.
Synonymous of master DNS. Notice that in DNS, primary and secondary DNS only refer to where the DNS data is created (primary) and when it is merely copied (any secondary). From the clients perspective, all DNS servers which a domain delegates to are equivalent and indistinguishable. For this reason, "master" is likely a less misleading name.
Corollary: secondary servers (like BuddyNS) serve your DNS at all times, not only when your primary server is unavailable.
Process
- Select the server type of your primary DNS server. See options below.
- Configure it as described. See instructions below.
- Test to confirm this step worked. See guide below.
Click on your DNS software from the list below. If your software is not in list, feedback us!
Select your Primary DNS server/service type
Bind, and its successor Bundy, are the most common software. Perform the following actions:
- locate the
options {section in your main configuration file/etc/bind/named.conf(or one of the files it includes):options { - add this block into that section; note that transfer must be enabled on ALL addresses:
# add this inside the "options {}" block allow-transfer { # allow ALL of the following addresses! Miss some and transfer will fail. %%server_conf%% }; # Ignore this if you didn't restrict queries with allow-query: allow queries from BuddyNS hosts #allow-query { %%server_conf%%}; - Tell BIND to UPdate with the new configuration: run as root this command:
service named restart
For cPanel/WHM we have a custom-built integration plugin. It will let you control your domains exclusively from your cPanel/WHM server, and have BuddyNS transparently replicate your zones in the background.
See our BuddyNS-cPanel integration plugin page.
If you're running DjbDNS (TinyDNS), you've probably gone through its standard installation process and therefore have axfrdns running. (If not, follow the link and do :) It takes about 5 minutes ).
Perform these operations:
- edit axfrdns' config file:
nano /var/axfrdns/tcp # or /etc/axfrdns/tcp ? - add these lines at beginning of the file:
# allow ALL of the following addresses! Miss some and transfer will fail. %%server_conf_4%% # and this if you have IPv6 enabled: %%server_conf_6%% - commit the change (no reload/restart is needed):
cd /var/axfrdns && make
When using Dyn, you edit your zone(s) on Dyn.com's website. Dyn serves as your primary DNS server and provides zone data to BuddyNS via AXFR. Here's what to do:
- Follow Dyn's instructions for Allow zone data to be downloaded via DIG for all of your domains.
- Add each of the following IP addresses as Custom External Servers:
# allow ALL of the following addresses! Miss some and transfer will fail. %%server_conf%% - On BuddyNS, enter Dyn's AXFR host as Primary Server:
208.78.68.66
.
Done!
When using Afraid' FreeDNS, you edit your zone(s) on Afraid FreeDNS's website. Afraid serves as your primary DNS server and provides zone data to BuddyNS via AXFR.
Here's what to do:
- Log into your Afraid account.
- Follow "Backup DNS" in the main menu, then Manage AXFR Allow ACLs.
- Add each of the following addresses:
# allow ALL of the following addresses! Miss some and transfer will fail. %%server_conf%% - On BuddyNS, enter Afraid's AXFR host as Primary Server: 50.23.197.95.
If you want to apply this configuration to multiple domains, add the following domains and use "clone" with the domain you configured for AXFR.
Done!
DNSMadeEasy has documentation to setup your zones to allow zone transfer to a secondary service such as BuddyNS.
Here's the short version:
- Log into your DNSME account and select Advanced → Transfer ACL (AXFR) from the top menu.
- In the Transfer ACL (AXFR) page, click the "+" symbol to add ACLs.
- Name the ACL "BuddyNS-transfer".
- Add the following IPs (use the -button to copy the snippet):
%%server_conf_4%%
Now that you have a rule to allow transfer from BuddyNS servers, apply it to your domains:
- Select DNS → Managed DNS from DNSME's top menu.
- Select the domain you want to edit.
- Select tab Settings.
- Set parameter Zone transfer (AXFR ACL) to "BuddyNS-transfer".
- Press Save.
- Click tab Name Servers, and look at block "AXFR Server (used for transfers and NOTIFY)". The "IPv4" column shows you the primary/master IP address that DNSMadeEasy assigned to you. That's usually
208.94.147.18(foraxfr2.dnsmadeeasy.com), but occasionally63.219.151.3(foraxfr1). - Go to your BuddyBoard and add all your zones. For "Primary Server" use the IP address assigned to you as "AXFR Server" by DNSMadeEasy as found in the step above.
Done!
When using GoDaddy, you edit your zone(s) on GoDaddy's website. GoDaddy serves as your primary DNS server and provides zone data to BuddyNS via AXFR. Here's what to do:
- Follow GoDaddy's instructions for Enabling Secondary DNS with Our Nameservers as Masters.
- As IPv4 Address Range of slave nameservers,
enter ALL of the following BuddyNS transfer hosts:
If you need to enter address ranges, enter each address as both Starting and Ending.# allow ALL of the following addresses! Miss some and transfer will fail. %%server_conf_4%%
GoDaddy does not support IPv6 transfers at the time of writing. - On BuddyNS, enter GoDaddy's AXFR host as Primary Server:
97.74.112.2.
Done!
When using maraDNS, add this line to maraDNS' configuration file:
# allow ALL of the following addresses! Miss some and transfer will fail.
zone_transfer_acl = "%%server_conf%%"
# or this if you do NOT use IPv6:
#zone_transfer_acl = "%%server_conf_4%%"
Refer to using maraDNS as master for further details.
Recent versions of Windows DNS Server appear to allow zone transfer by default, so you'll require no setup unless you previously prevented traffic: AXFR requests from BuddyNS will just work. Simply add your zones to BuddyNS and use the Target tool to confirm that.
If transfer (AXFR) does not work, you may have previously entered rules to deny transfers. To check your current policy, use command Get-DnsServerZoneTransferPolicy from PowerShell. To remove them, use command Remove-DnsServerZoneTransferPolicy.
If you want to manually restrict your zone transfers, make sure you keep ALL of the following address enabled:
# allow ALL of the following addresses! Miss some and transfer will fail.
%%server_conf%%The overall approach we recommend with NSD is to enclose BuddyNS-specific settings in a separate file, and then include this file in every zone you declare. If you use patterns,
- Create a file
/etc/nsd/buddyns_zone.conffor BuddyNS-specific zone settings:nano /etc/nsd/buddyns_zone.conf - Add the following lines:
# allow ALL of the following addresses! Miss some and transfer will fail. %%server_conf%% - Refer ("include") this file in each one of your
zoneblock, orpatternif you use one:# nano /etc/nsd/nsd.conf # locate your "zone:" blocks, and append to each: include: /etc/nsd/buddyns_zone.conf - Restart
nsdafter the update:sudo nsd-control reconfig
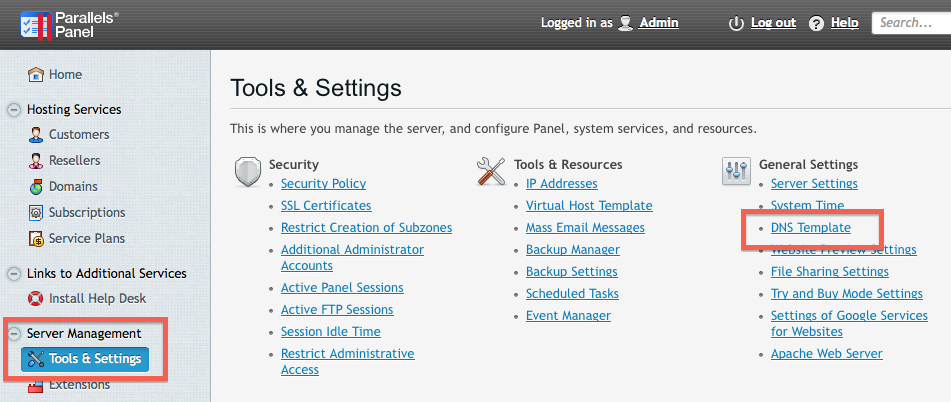
When using Parallels Plesk Panel, you host your zones on Parallels Plesk Panel, and use BuddyNS to improve your uptime. Follow this procedure:
- Log into your plesk Admin's account
- Choose "Tools & Settings" in "Server Management" in the navigation menu.
- Choose "DNS Template" from the "General Settings" group.
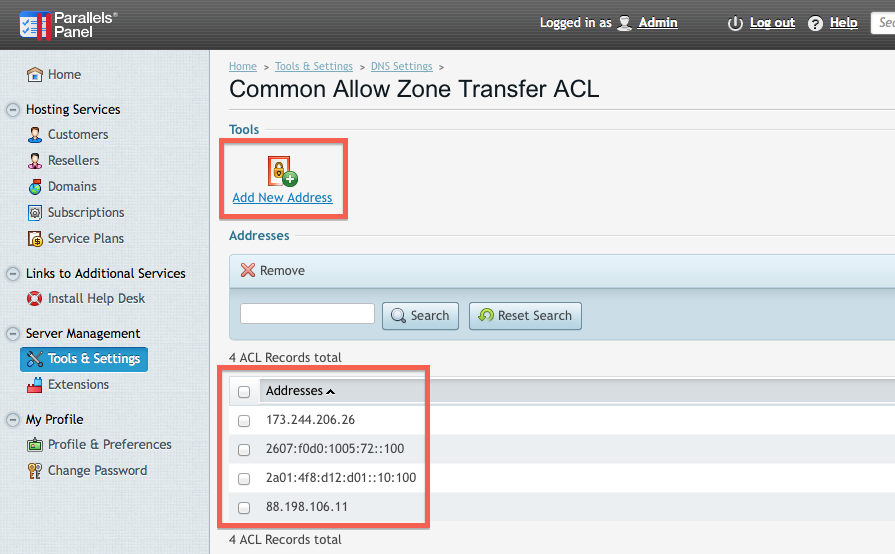
- Choose "Transfer Restrictions Template"
- Choose "Add New Address" to add each of BuddyNS' transfer server's addresses:
# allow ALL of the following addresses! Miss some and transfer will fail. %%server_conf%%
Done!
P.S.: There's a 3rd-party Extension (plug-in) to integrate BuddyNS into Plesk. Thanks Jerome! Like any 3rd-party code, use at your own risk and do not enquire our support about it.
When using PowerDNS:
- Edit PowerDNS's configuration file:
nano /etc/powerdns/pdns.d/pdns.local # or here? nano /etc/powerdns/pdns.conf - add these lines to it:
# allow ALL of the following addresses! Miss some and transfer will fail. allow-axfr-ips=%%server_conf%% disable-axfr=no master=yes - apply the new configuration:
service pdns reload
[Contributed by JH software, maintainer of Simple DNS Plus.]
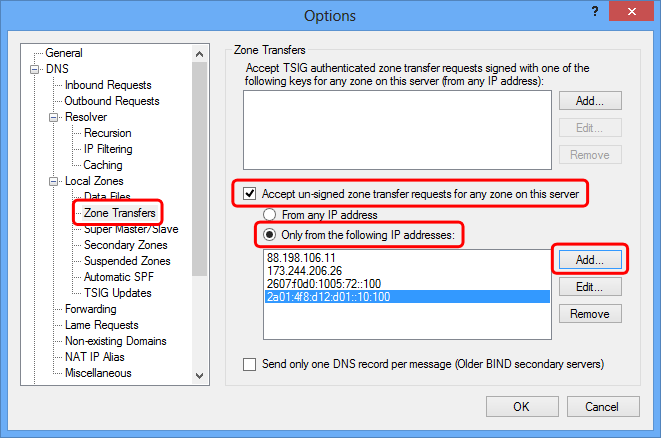
When using Simple DNS Plus, follow these steps:
- Reach the Options dialog in Simple DNS Plus
- Follow DNS → Local Zones → Zone Transfers in options navigator.
- Check "Accept un-signed zone transfer requests for any zone on this server"
- Select "Only from the following IP addresses"
- Press the "Add" button and add all of BuddyNS' transfer host addresses (miss some and transfer will fail!):
# allow ALL of the following addresses! Miss some and transfer will fail. %%server_conf%%
Done!
When using TotalUptime, you edit your zone(s) on TotalUptime's website. TotalUptime serves as your primary DNS server and provides zone data for DNS replication to BuddyNS via AXFR.
Follow these steps to set this up:
- On your TotalUptime account, allow zone transfers by BuddyNS. Follow
TotalUptime's Enable
zone transfer doc. Permit transfer to ALL of BuddyNS' transfer systems (miss some and transfer will fail!):
# allow ALL of the following addresses! Miss some and transfer will fail. %%server_conf%% - On BuddyNS, add your TotalUptime domains using as Primary Server
either of TotalUptime's master DNS server addresses:
- 216.59.59.1
- 216.59.60.1
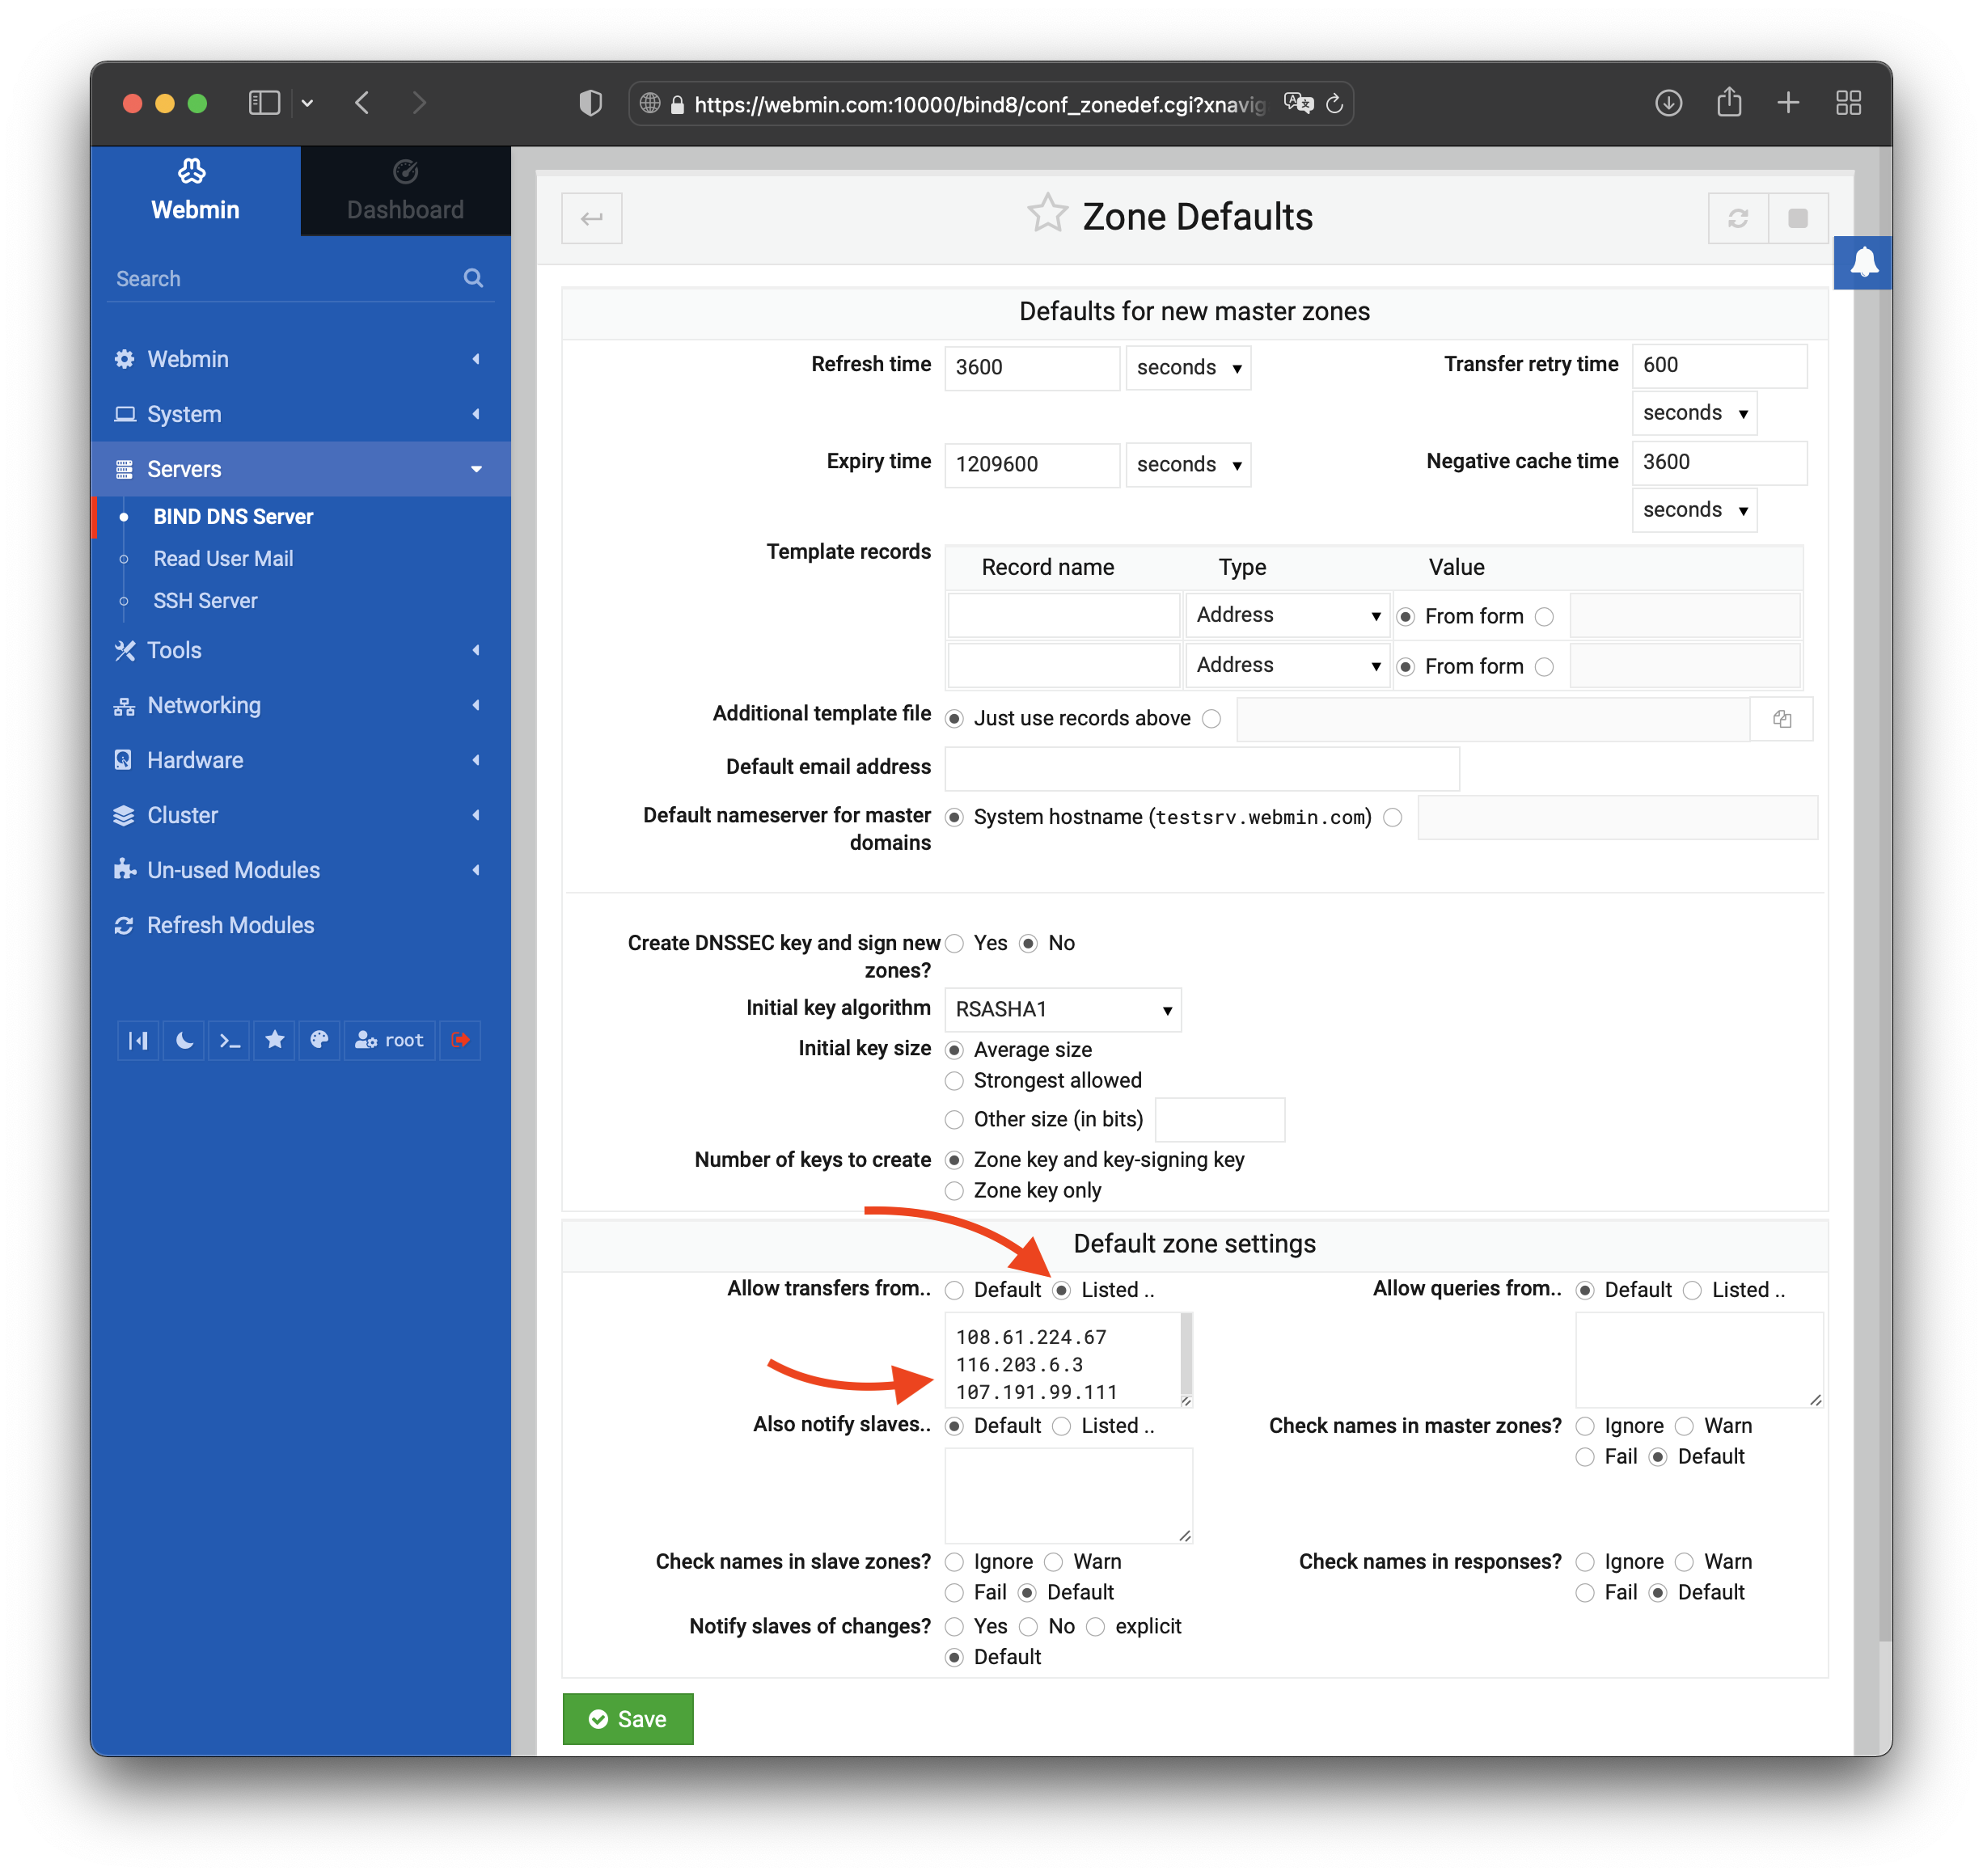
- Log into your Webmin; from menu "Servers" choose "BIND DNS Server".
- Choose "Zone Defaults" to configure AXFR servers for all your zones.
- Look for setting "Allow transfers from".
- Next to it, select option "Listed .." instead of
"Default" - Add all of the following BuddyNS transfer servers in the textbox:
# allow ALL of the following addresses! Miss some and transfer will fail. %%server_conf_4%% - If you want to enable IPv6 transfers, you may include these IPv6 addresses too:
# allow ALL of the following addresses! Miss some and transfer will fail. %%server_conf_6%% - Save your configuration to apply it.
Done!
In this setup, you edit your zone(s) on ZoneEdit's website; ZoneEdit serves as your primary DNS server and provides zone data to BuddyNS via AXFR.
Follow ZoneEdit's own instructions to enable zone transfer on your domains. Once you reach the field to enter Zone Transfer addresses to allow, copy & paste all of the following addresses:
%%server_conf%%Done with the Allow Zone Transfer (AXFR) part.
When you'll get to the next configuration step (zone delegation), you'll need to add NS records for each domain.
Do so from menu Domain → DNS Settings → NS records → Edit.
In there, keep the LOCAL entry — that expands ZoneEdit's own NS servers — and
add the BuddyNS servers of your choice. For each BuddyNS server of your choice, use @ as
value for the HOST field.
When using any other nameserver not included in this list, your goal is to allow AXFR for the following IPs of the BuddyNS cluster:
# allow ALL of the following addresses! Miss some and transfer will fail.
%%server_conf%%Please feedback us with the name of your DNS system so we can provide docs for commonly requested ones.
Services known to lack support for zone transfers are:
- Namecheap's FreeDNS
- Rackspace Cloud DNS
- CloudFlare DNS
Each of these services is therefore incompatible with BuddyNS (or any secondary DNS service).
Each entry was checked with their respective support desk. Some may have implemented AXFR support recently. Please report any correction to us.

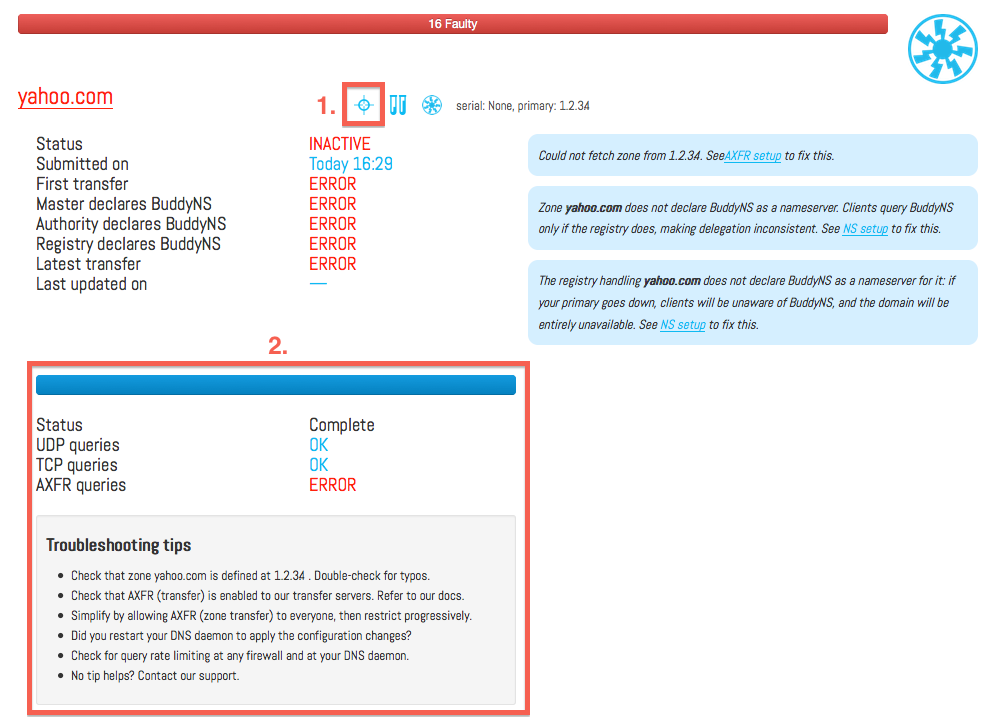
 button next to the zone you want to test. Any zone on the master server you just configured is just as good a test case.