BuddyNS integration with cPanel/WHM
BuddyNS offers transparent integration with cPanel/WHM. This means: you control your domains entirely through your cPanel/WHM interface, and BuddyNS transparently propagates DNS for them in the background.
Integration overview
Goals and Benefits
Why using BuddyNS for replicating your domains managed with a cPanel/WHM server?
- Continuity
- If your server or DNS software are temporarily unavailable, your DNS continues to run smoothly.
- Security
- Add confidentiality and fight DNS attacks with our drop-in encrypted DNS, without extra setup on your side.
- Performance
- Your clients resolve your domains much faster thanks to low-latency, geographically optimized servers.
- Simplicity
- You can eliminate the costs and complexity of running extra DNSONLY servers.
Why is BuddyNS more appropriate than other DNS vendors?
- Best consistency
- Upon any change to your DNS data, BuddyNS synchronizes within minutes, as opposed to customary hours.
- Seamless integration
- Our integration plugin makes DNS replication effortless to you and your users.
Target users and System Requirements
Scenario requirements
- Full (root) access to your cPanel/WHM server for installation.
- Access to WHM for starting BuddyNS replication.
- A BuddyNS account.
System requirements
- cPanel/WHM versions: tested on cPanel v11.40 and above; may reasonably work down to 11.32.
- cPanel/WHM profile: currently only installations with BIND or PowerDNS as DNS server are supported (Feedback us).
- cPanel's PHP open_basedir Tweak disabled. This prevents plugins from accessing configuration files, and cannot be cleanly customized.
- The following components installed:
- Python 2.6 or higher (see python -v)
- curl
- the /sbin/service utility
- the cron daemon
- System: works with the minimum parameters declared by cPanel (512MB RAM, 10GB disk).
- Resource occupation: few KBs of disk space, essentially zero CPU time.
How it works
Here's an overview of your life with this integration plugin:
- You create a BuddyNS account.
- You install our lean cPanel/WHM integration plugin (automated, run a script).
- When you create a new user account, its domain is replicated transparently onto BuddyNS.
- When your resellers add AddOnDomains or Parked domains, they are replicated transparently onto BuddyNS.
- When any of your zones get modified, BuddyNS automatically reflects the change promptly.
- During server downtime, network hiccups, or maintenance, your DNS runs smoothly through BuddyNS.
Installation
Note
This installs similarly to cPanel: with a fully automated install script. Contrarily to cPanel, this can be removed just as easily with an enclosed removal script.Foreword
Make room for 30-60 minutes to run this through completion. If anything goes wrong, contact our support. If anything is unclear to you, or does not reflect your cPanel/WHM version, please report to our feedback address.
Please observe and replace the following values used in your guide for your cPanel/WHM installation:
- When you read 12.13.14.15, replace it with the main IP address of your cPanel/WHM server
- When you read foobar.com, replace it with the main domain name of your cPanel/WHM server (your domain name as a hosting provider)
Install the BuddyNS integration plugin
 Get a BuddyNS account (if you don't have one already):
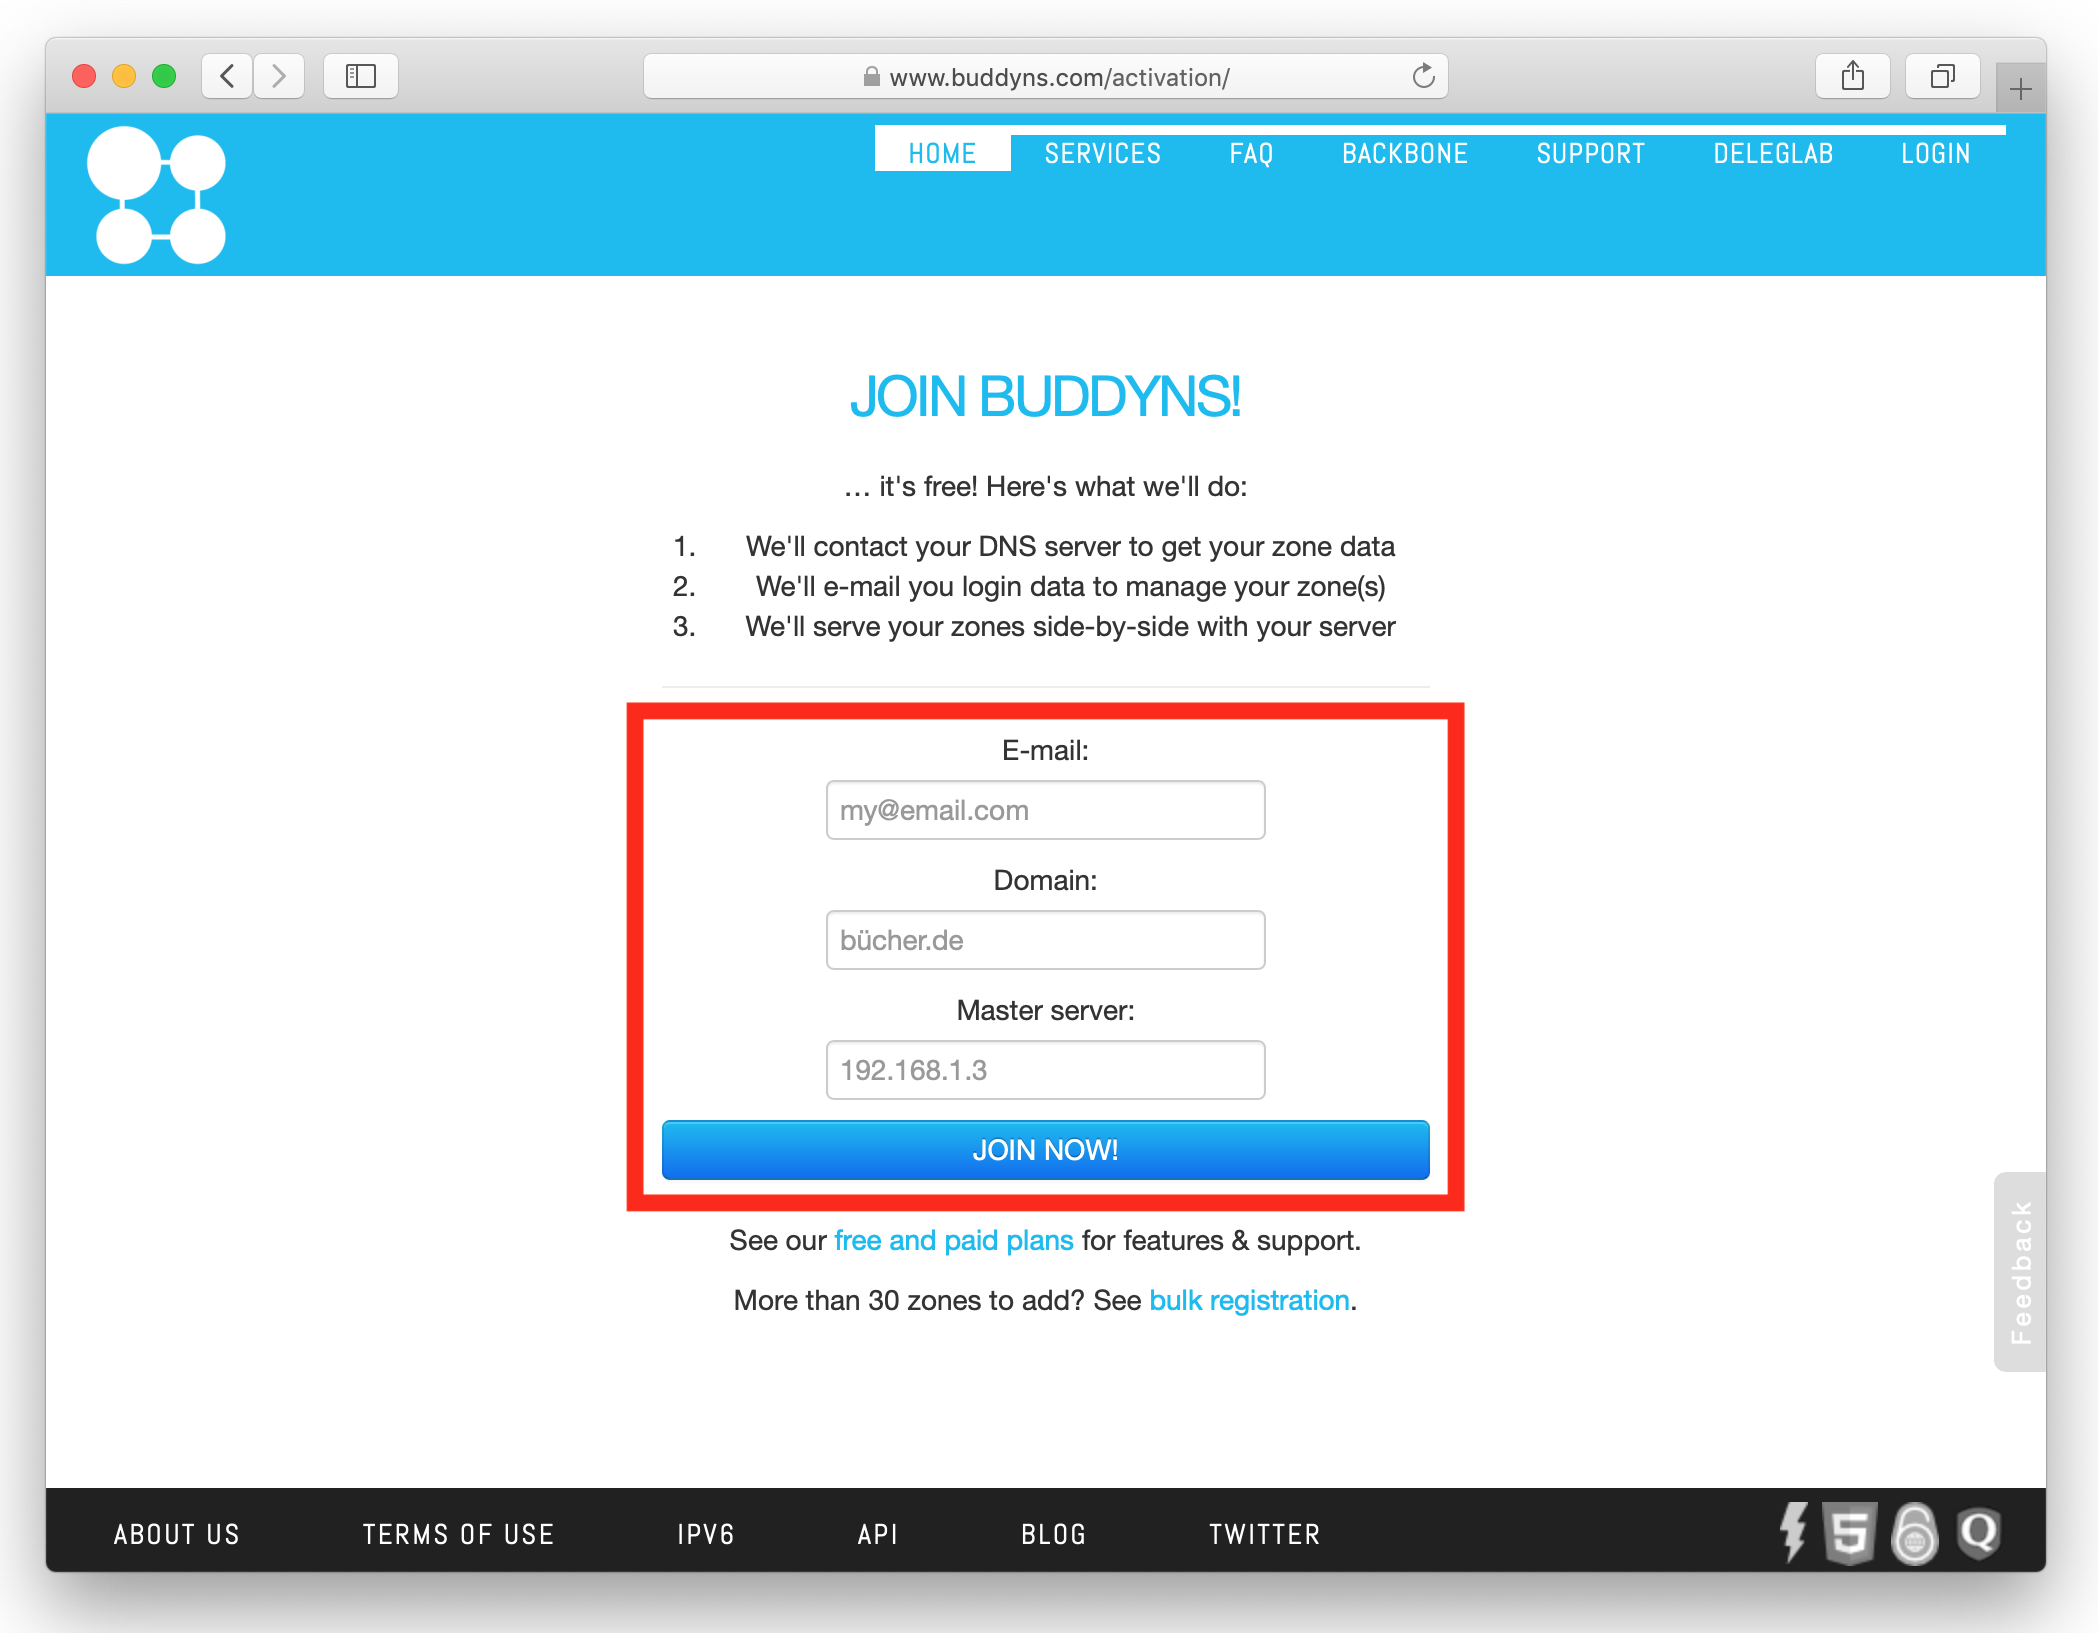
activating your domain on BuddyNS:
Get a BuddyNS account (if you don't have one already):
activating your domain on BuddyNS:
- as domain name, enter foobar.com,
- as IP of primary, enter 12.13.14.15,
- as contact e-mail, enter one unrelated to your hosting, so you're still reachable if it has downtime
- Enable cPanel mode for your BuddyNS account:
- click the SETTINGS button in your BuddyBoard ("Account" pane)
- enter your current password and check the Enable cPanel mode checkbox
- hit Confirm to save.
- Log into a shell on your WHM server as root:
# get a console on your cPanel/WHM server ssh root@12.13.14.15 - Download the installation script:
curl -LO https://lx.buddyns.com/cpanel-whm/installer.sh - Run the installation script:
This will download, extract, and place the plugin components.sh installer.shGot multiple python versions which confused the installer? Run
export PYTHON_BIN="/path/to/your/pythonN"to specify which python to use, before running installer.sh.
Configure BuddyNS integration

- Log into your WHM web application as root, and reach Plugins → BuddyNS DNS replication (see screenshot).
- You are required to:
- Select Enable BuddyNS integration
- Enter your API Key for your cPanel/WHM server to access BuddyNS' API
- Make sure BuddyNS replicates all zones active on your cPanel/WHM server:
# synchronize your zones on cPanel/WHM and BuddyNS:
/opt/BuddyNS/bin/sync_buddyns_zones.py
At this point, any domain added to your cPanel/WHM system, by you (accounts), or by your users (AddOn and parked domains) gets automatically propagated onto BuddyNS.
Extra test? — You can use Create a New Account on cPanel/WHM using a random domain, and verify on your BuddyBoard that the domain makes it into BuddyNS. You can then use Terminate an Account on cPanel/WHM and verify that the domain is removed from BuddyNS.
Provide BuddyNS delegation
Add DNS servers to the nameservers declared by your domains to get DNS redundancy and speedup:
- Decide 2 DNS servers from the BuddyNS backbone to delegate your zones to. We offer many servers (see list here), select your 2 based on proximity to your users.
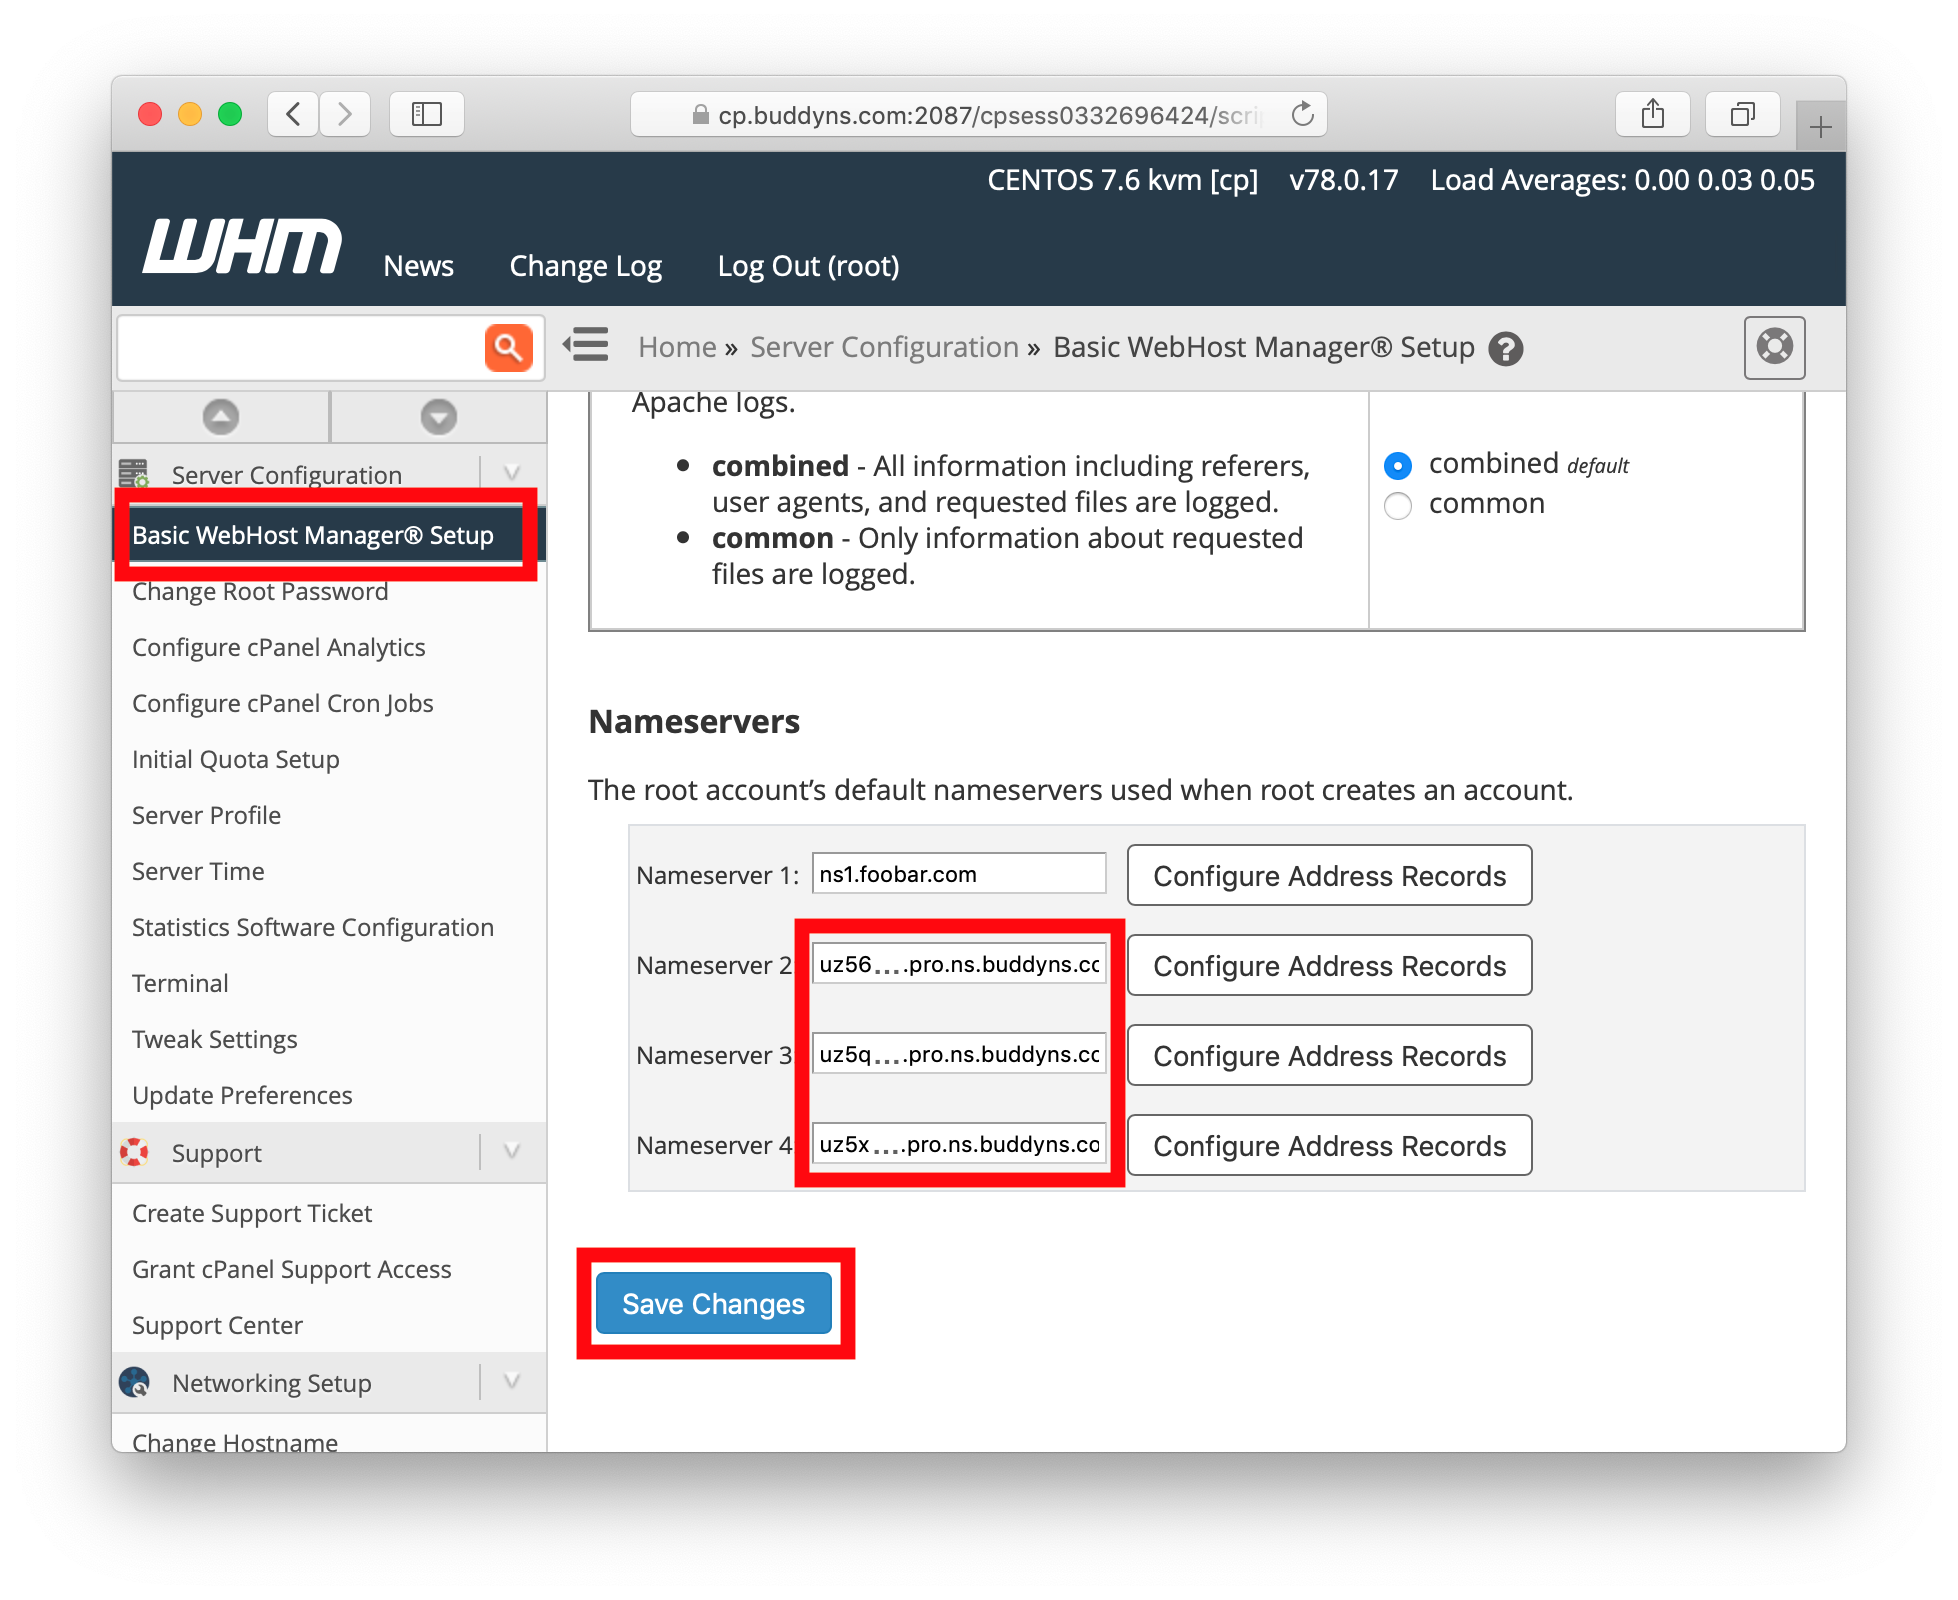
- Log into your WHM webapp, reach the Server Configuration → Basic Setup, and find the Nameservers section at the end of this page.
- Enter the two BuddyNS server names in two free slots, and press Save Changes.
- These settings will apply to newly added domains. To update delegation for previously added domains too, get a console onto your server and run the following:
Nota bene — you need to update delegation at your registry as well after performing this step. Registry delegation is the more important of the two.# automatically update delegation for existing domains /opt/BuddyNS/bin/update_ns.sh
After completing this, you can log into your BuddyBoard Zones page and verify the delegation status of your zones.
At this point, Congrats! Your basic setup is done. If you have special needs, find additional configuration options below.
Technical notes
The integration package is designed as follows:
- When accounts are created (or removed) from WHM, their domain is added (or removed) on BuddyNS via a hook immediately.
- cPanel offers no hooks for real-time capturing of domains added (or removed) by your users and resellers. These are detected and reflected onto BuddyNS within 30 minutes by a cron script. This is extremely lightweight (10ms per run on a minimum-requirements virtualized system).
- Changes to your domains data (zone records) are detected and retrieved entirely by BuddyNS without action from your server.
Selecting which zones to synchronize
The plugin synchronizes all zones by default: zones found on cPanel and not at BuddyNS are added (onto BuddyNS), zones found at BuddyNS but not on cPanel are removed (at BuddyNS).
You can change this behavior by excluding zones from synchronization
(see file /etc/BuddyNS/ignored_zones.txt). Zones listed in
this file are not added (or removed) if they are found on cPanel but not on
BuddyNS (or viceversa). This allows you to exempt some customers from DNS
replication.
Do you want to select by inclusion instead? That is,
replicating only a fixed set of zones no matter what new customers you add
on cPanel. In this case, simply activate the zones you want to replicate
on BuddyNS manually, and keep cPanel integration disabled.
BuddyNS will detect with its own logic whenever you change your DNS data,
and synchronize accordingly.
You may still want to install the integration plugin, and keep
it disabled. This takes care of the initial setup of your server for you,
and gives you a preview of your DNS traffic from inside your cPanel
server.
Troubleshooting
In case of issues, proceed as follows:
- Use the Target tool in your BuddyBoard to perform real-time checks of your zone transfer configuration.
- Look into log files
/opt/BuddyNS/var/log/sync_zones.logand/opt/BuddyNS/var/log/buddyns.log. This may reveal a local/configuration issue. - You can increase log verbosity to 'debug' in file
/etc/BuddyNS/loglevel.txt. - You can enable/disable recurring sync in
/etc/cron.d/buddyns. Please do NOT change the frequency!
If none of these helps, contact our support to report an issue. Before doing so, make to include all the essential troubleshooting data we need to help effectively: this includes system, cPanel and plug-in versions, along with their respective basic configuration. Plug-ins ≥2017012101 include a nifty tool to carry out this step quickly & reliably for you. Simply run the following:
/opt/BuddyNS/bin/send_sysreport.sh
(Privacy note: send_sysreport.sh allows you to review the
data assembled before sending. Our support team retains this data until
the successful closure of your ticket.)
Upgrade
The plug-in page notifies you when new versions are released, with a message on top of the plug-in page itself. Checks for new versions occur on a weekly basis.
In order to upgrade to a new version, run the deinstaller.sh script with
option upgrade:
/opt/BuddyNS/bin/deinstaller.sh upgradeYou may then confirm the new version by checking the version number on the top/right of the plug-in page.
Why do we not make this happen behind the scenes? cPanel users are generally sensitive to having full control of what runs on their server.
Migration to a new cPanel/WHM server
Say you want to migrate your cPanel/WHM to a new server. How do you do that?
Call OLD your existing server, and NEW the destination server. Proceed as follows:
- Install BuddyNS cPanel plug-in on
NEW, following the standard steps for installation & configuration. During installation, the plug-in will enable AXFR from BuddyNS servers onNEW. - Temporarily disable the BuddyNS integration plug-in from
OLD. You can do so from the web screen of the plug-in. Your zones will stay registered – on your BuddyNS account – withOLDas master. - Perform a dummy test: add a new test account
zonetest123.comonNEW, then run/opt/BuddyNS/bin/sync_buddyns_zones.pyonNEW, and verify that the test zone shows up in your BuddyNS. Use the Target tool to verify that the zone transfers successfully fromNEW. - If successful, remove the test account from
NEW. - Perform a live test: remove a real zone, then immediately run
/opt/BuddyNS/bin/sync_buddyns_zones.pyonNEW. Verify that the new zone shows up again in your BuddyNS account, with the IP address ofNEW. - Once confirmed successful, proceed by doing so for each zone. You can also automate that by running the script below from
NEW.
Automating migration
Got a lot of zones to migrate to your NEW server? Below is a script to automate the migration of each zone on your BuddyNS account to use the IP address of the NEW server.
The script will:
- Take a list of zones to migrate from file
zones_to_migrate.txt. - For each zone, remove it from the BuddyNS account, and immediately re-add it with the IP address of
NEW.
Run the commands in a small test first, with 3 zones only from your list. Run one line at a time and check the output, for best control:
# run this on NEW server

# These commands automatically update a bunch zone at BuddyNS to use the new IP address

# add a couple of test zones to the file (use valid)
/opt/BuddyNS/bin/whm_utils.py domains | head -n3 | tee zones_to_migrate.txt

# run bulk migration for these few test zones
master_ip=$(/opt/BuddyNS/bin/whm_utils.py master_ip)
echo "Will migrate zones to my address = $master_ip"
cat zones_to_migrate.txt | while read zname ; do echo "=== Migrating $zname ===" ; /opt/BuddyNS/bin/buddyns_ctl.py del "$zname" || echo "Removal of $zname failed. Check BuddyNS account."; /opt/BuddyNS/bin/buddyns_ctl.py add "$master_ip" "$zname" || echo "Addition of $zname failed. Check BuddyNS account." ; done
If the above worked, unleash the commands on your full list of zones available on the NEW server. Again, run one line at a time and check the output, for best control:
# Check the BuddyNS account now, and ensure that the test zones look good.
# If they do, proceed to Bulk-update all other zones.
# Nota bene: there's a "pause" in the command below, to ensure BuddyNS' API rate limits don't break your flow.
/opt/BuddyNS/bin/whm_utils.py domains | tee zones_to_migrate.txt
estimated_time_s=$(awk 'END { print 3*NR }' zones_to_migrate.txt)
echo "This will take some ${estimated_time_s}s to run. Get some tea :)"
cat zones_to_migrate.txt | while read zname ; do echo "=== Migrating $zname ===" ; /opt/BuddyNS/bin/buddyns_ctl.py del "$zname" || echo "Removal of $zname failed. Check BuddyNS account."; /opt/BuddyNS/bin/buddyns_ctl.py add "$master_ip" "$zname" || echo "Addition of $zname failed. Check BuddyNS account." ; sleep 2; done
Removal
The instructions following are for WHM removal only: they'll leave the zones in your BuddyBoard unaffected. If you also want to clear your zones from your BuddyNS account, run this command as root on your WHM server prior to WHM removal:
delzones=`/opt/BuddyNS/bin/whm_utils.py domains`
for z in $delzones ; do /opt/BuddyNS/bin/buddyns_ctl.py del $z ; done
Alternatively, log into your BuddyBoard and use the DELETE ACCOUNT button if you want to eliminate your BuddyNS account altogether.
Now, on to removing the BuddyNS integration plugin from your WHM system:
- Remove BuddyNS nameservers from Server Configuration → Basic cPanel & WHM Setup.
- Reflect this change into your zones:
/opt/BuddyNS/bin/update_ns.sh - Run the removal script with
removeoption:/opt/BuddyNS/bin/deinstaller.sh remove
Changelog
| Version | Date (newest first) | Changes |
|---|---|---|
| 2023080201 [minor] |
August 2, 2023 |
|
| 2022112401 [minor] |
November 24, 2022 |
|
| 2022020401 [minor] |
February 4, 2022 |
|
| 2021120901 [minor] |
December 9, 2021 |
|
| 2021120601 | December 6, 2021 |
|
| 2021022501 | February 25, 2021 |
|
| 2020050901 [minor] |
May 9, 2020 |
|
| 2020050302 | May 3, 2020 |
|
| 2019122201 [minor] |
December 22, 2019 |
|
| 2019072801 [minor] |
July 28, 2019 |
|
| 2019070901 | July 9, 2019 |
|
| 2019062603 | June 26, 2019 |
|
| 2017120601 | December 6, 2017 |
|
| 2017061801 [minor] |
June 18, 2017 |
|
| 2017012101 | January 21, 2017 |
|
| 2016122701 | December 27, 2016 |
|
| 2016110401 | November 4, 2016 |
|
| 2016082101 [minor] |
August 21, 2016 |
|
| 2016060601 | June 6, 2016 |
|
| 2015080101 [minor] |
August 8, 2015 |
|
| 2015041801 | April 18, 2015 |
|
| 2015011601 [minor] |
January 16, 2015 |
|
| 2014022401 | February 24, 2014 |
|
| 2014011801 | January 18, 2014 |
|
| 1.1 | January 3, 2014 |
|
| 1.0 | December 13, 2013 |
|