Answer client queries with BuddyNS
You need to update your DNS information in both your zone and your registry.
The Internet wants you to use at least 2 DNS servers per zone, but BuddyNS gives you multiple, globally distributed servers for best speed and reliability.
1. Select your servers
— N.B.: These are Anycast addresses. Behind each are multiple DNS servers in different geographical locations. Your clients' queries will be transparently routed to the nearest server.
| DNS Server Name | Location |
|---|
Weird names, uh?
These are encryption keys. That's right, drop-in security for your domains, no extra work required on your side!
Make sure you copy the names exactly! Find out more about this beautiful technology on our DNS Security page.
2. Add NS records to your primary DNS server
Proceed as follows:
- Choose which BuddyNS nameservers you want to use from the list above. (3+ BuddyNS servers).
- Setup these same servers in your zone configuration at your primary server. See examples below for the concrete syntax in various DNS server types.
- Restart your DNS server to apply the changes. Changes to your registry may take 5 to 30 minutes to go public.
Configuration snippets for various DNS server types
- Open your zone file, e.g.
sudo nano /var/cache/bind/db.foo.com - Add the NS records for your selected BuddyNS servers:
# important: Append "." to all server names! zone "foo.com" { %%server_conf%%} - Restart the server:
sudo service bind9 reload
- Edit your TinyDNS data file:
sudo nano /var/tinydns/root/data - Add the NS records for your selected BuddyNS servers:
# add NS records to all your zones, as follows %%server_conf%% - Compile & send live your new DNS data:
cd /var/tinydns/root && sudo make
- Open your zone file, e.g.
sudo nano /etc/maradns/db.foo.com - Add the NS records for your selected BuddyNS servers:
# important: Append "." to all server names! %%server_conf%% - Restart the server:
sudo service maradns restart
- Open your zone file, e.g.
sudo nano /etc/nsd/foo.com.zone - Add the NS records for your selected BuddyNS servers:
# important: Append "." to all server names! zone "foo.com" { %%server_conf%%} - Restart the server:
sudo service nsd reload
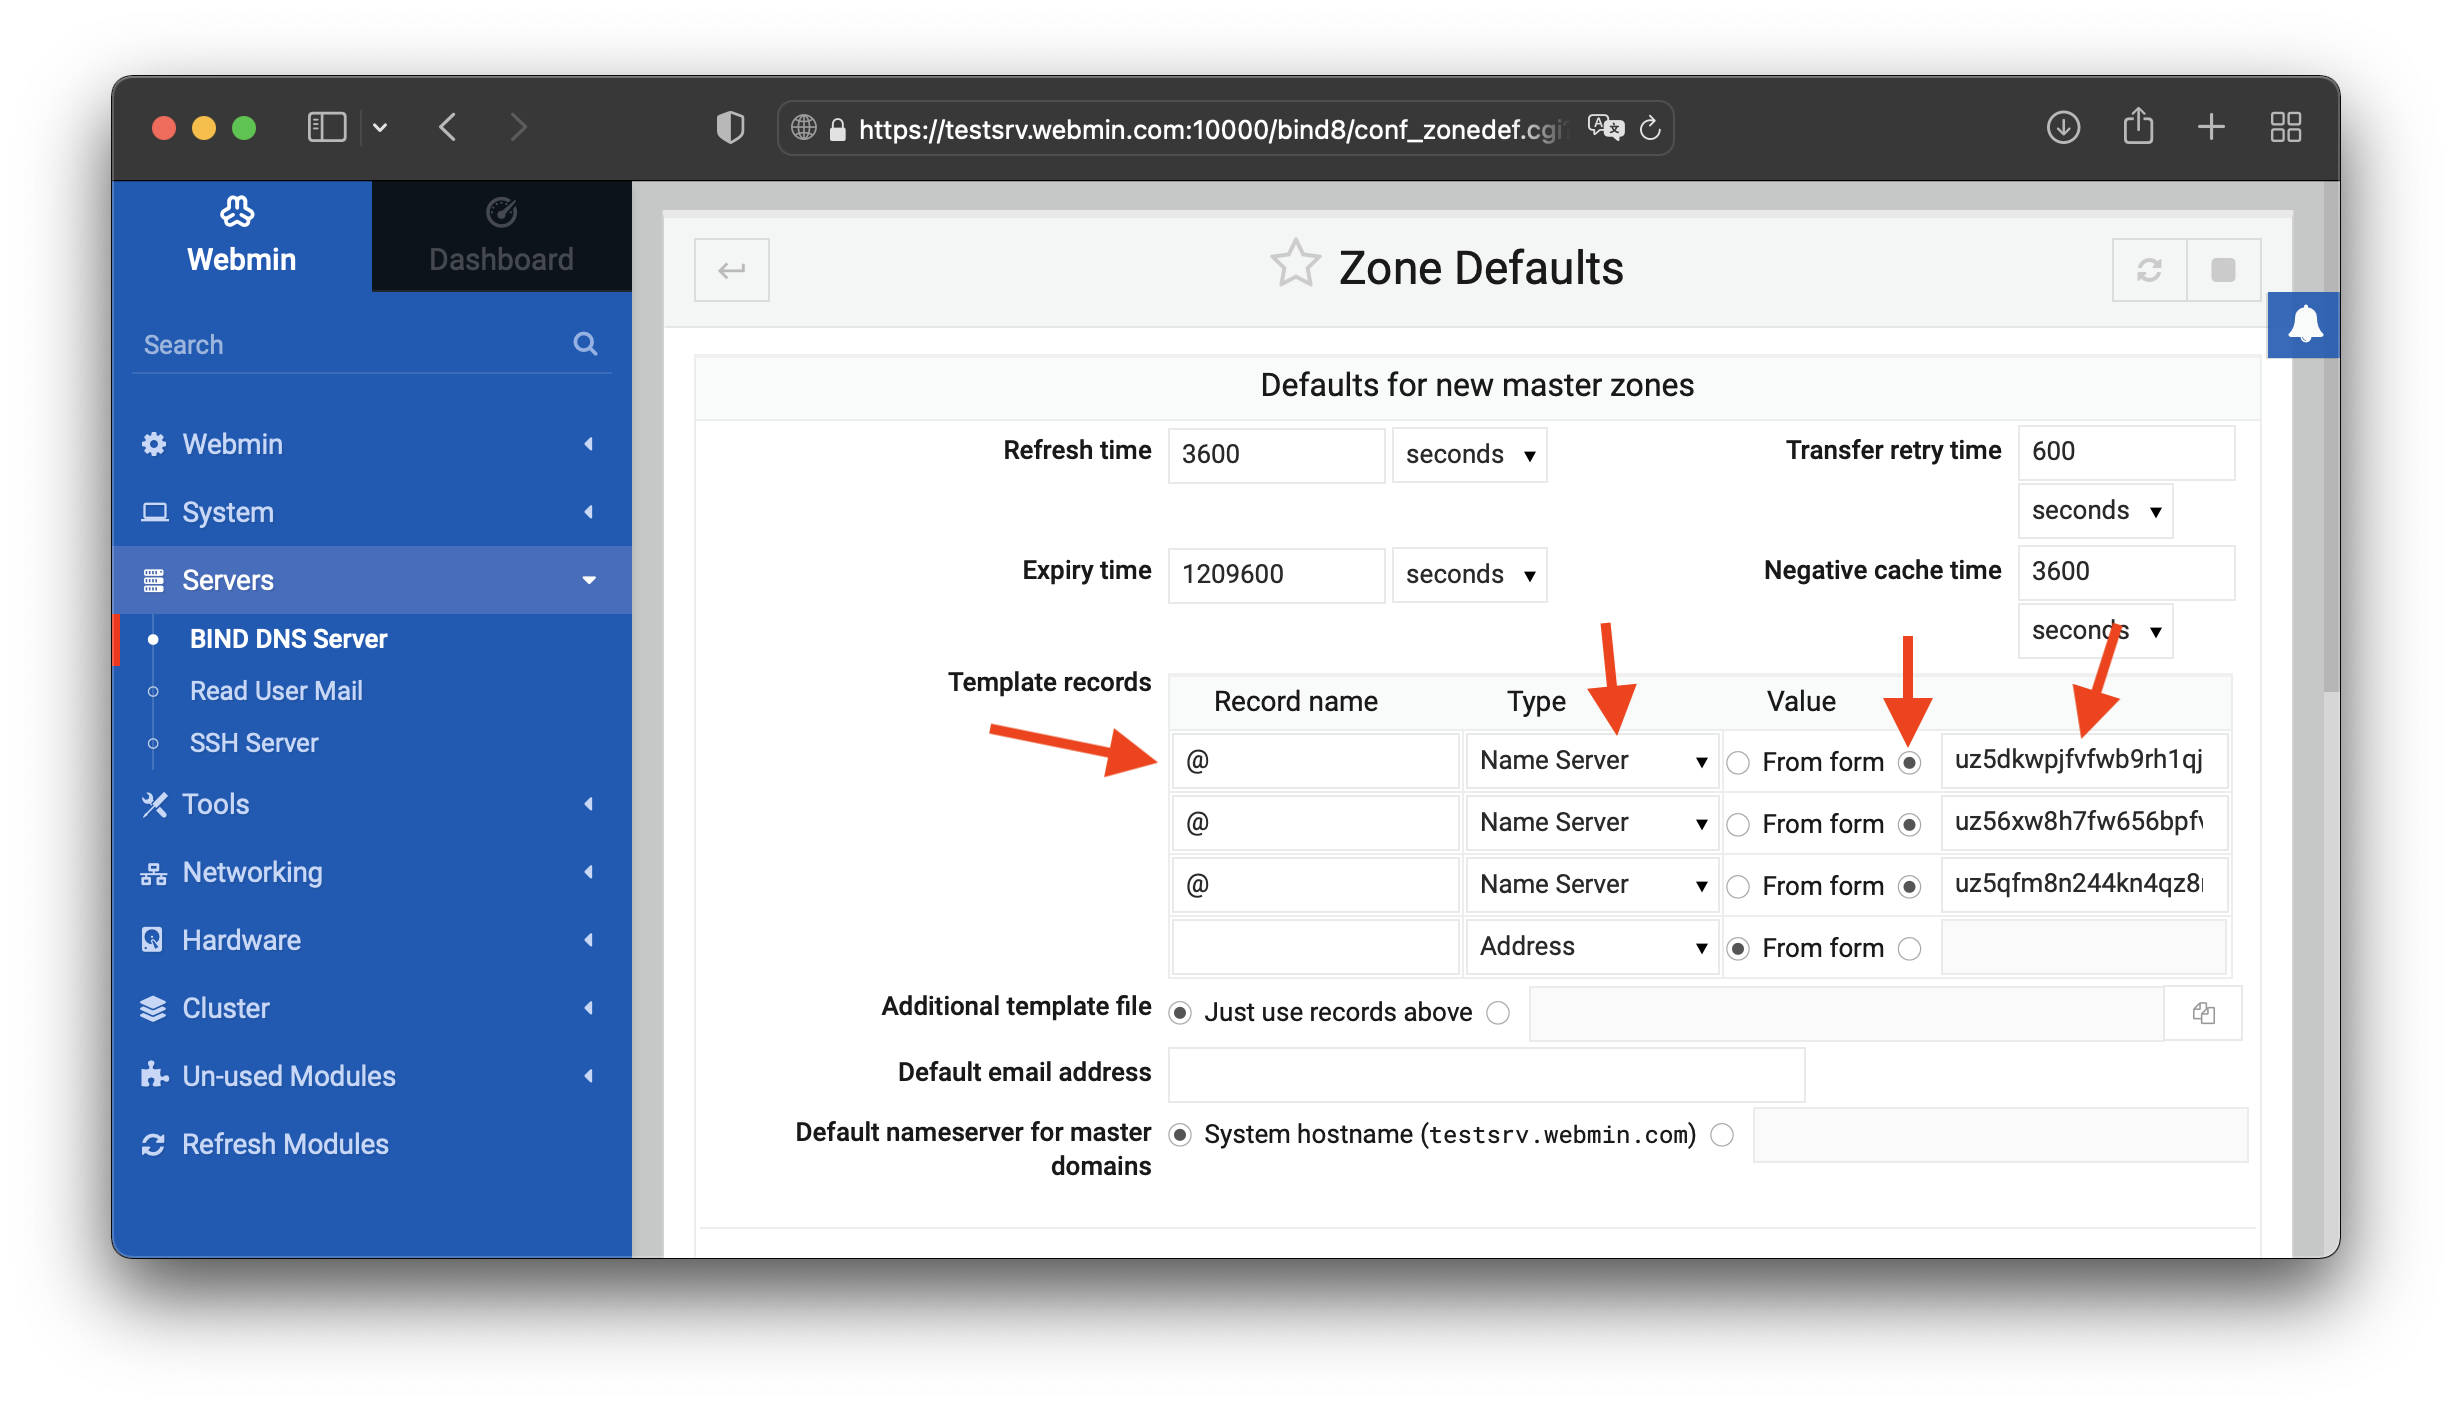
- Log into your Webmin; from menu "Servers" choose "BIND DNS Server".
- Choose "Zone Defaults" to configure AXFR servers for all your zones.
- Look for setting group "Template records".
- Add a NS record for each of your selected BuddyNS server:
- Enter
@("at" symbol) as Record Name; this signifies the zone itself. - Select Type =
Name Server - Check the other checkbox in "Value" to enable the text field: make sure to .
- Enter the name of your chosen BuddyNS nameserver in the text field, and make sure to suffix it with '
.' (dot)! e.g.uz52u1wtmumlrx5fwu6nmv22ntcddxcjjw41z8sfd6ur9n7797lrv9.free.ns.buddyns.com.
- Enter
- If you only have 2 free rows, Save the page and return to it, and Webmin will provide you with additional fields.
The steps so far ensure that new zones will automatically be delegated to BuddyNS. See the first image below.
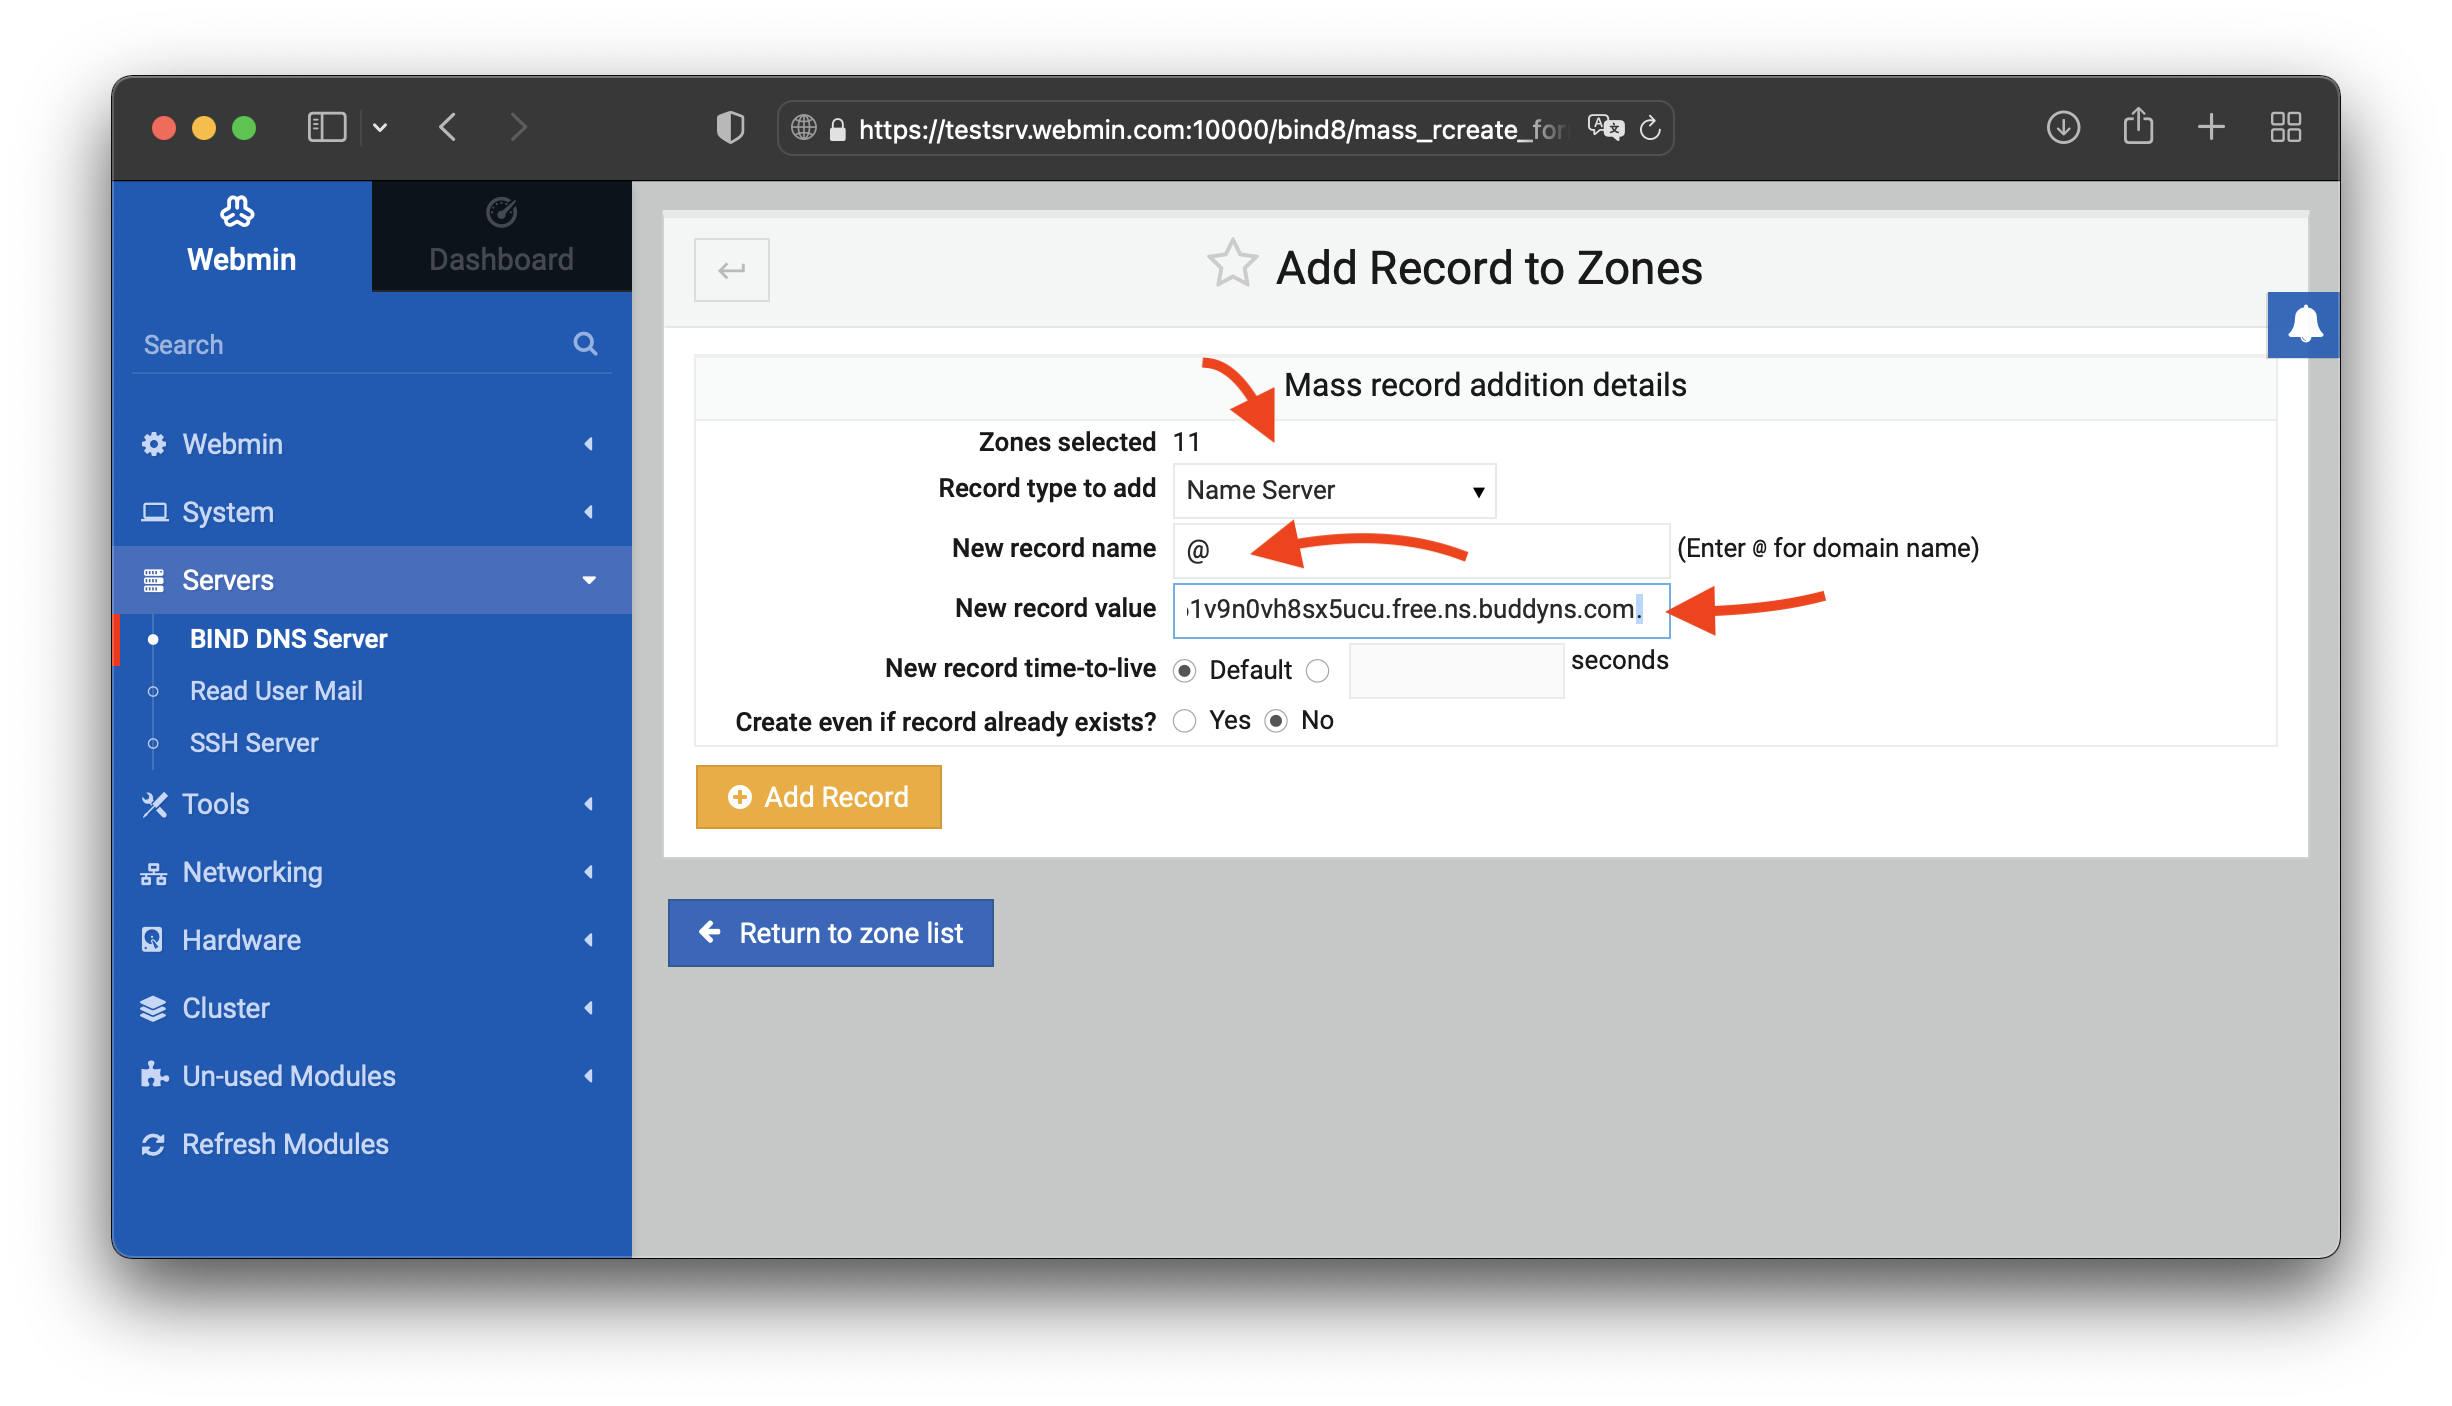
Now on to updating delegation for your existing zones:
- Return to menu "Servers" → "BIND DNS Server".
- In block "Existing DNS Zones" click to Select All existing zones; then de-select system zones like {"code", "localhost", "0", "127", "255"} etc.
- With all legitimate zones selected, click "Add Record to Selected".
- In the "Add Record to Zones" page opened, choose the following:
- Record Type = "Name Server"
- New record name =
@ - New record value = the name of one of BuddyNS's servers you chose. Make sure to suffix the name with '
.' (dot)!
- Click "Add record" and repeat the process for the additional BuddyNS servers you chose.
See the second image below. And with this, you're done!
Simply copy-paste configuration entries for existing NS records, adapt them to contain the BuddyNS server you chose, and restart the server to apply the new configuration.
3. Add the same records to your registry
If you add delegation at your primary only, and omit the registry, your domain will be unreachable as soon as your primary DNS fails.
Goal
Have the domain name registry point clients for your domain to BuddyNS servers, along with your primary.
Domain name registry
This is the organization which sold you your domain example.com, in this context.
The have a configuration panel which enables you to set some minimal information your domain.
This information includes which nameservers the Internet will reach to inquire about
services like WWW, email etc for example.com.
The domain name registry ensures to merge this information into DNS servers hosting
top-level domains like .com.
Process
Proceed as follows:
- Log into the control panel of the registry for your domain.
- Reach the section to configure Nameservers.
- Add an entry for each of the
*.ns.buddyns.comnameservers which you configured into your primary server above.
4. Validate your delegation setup
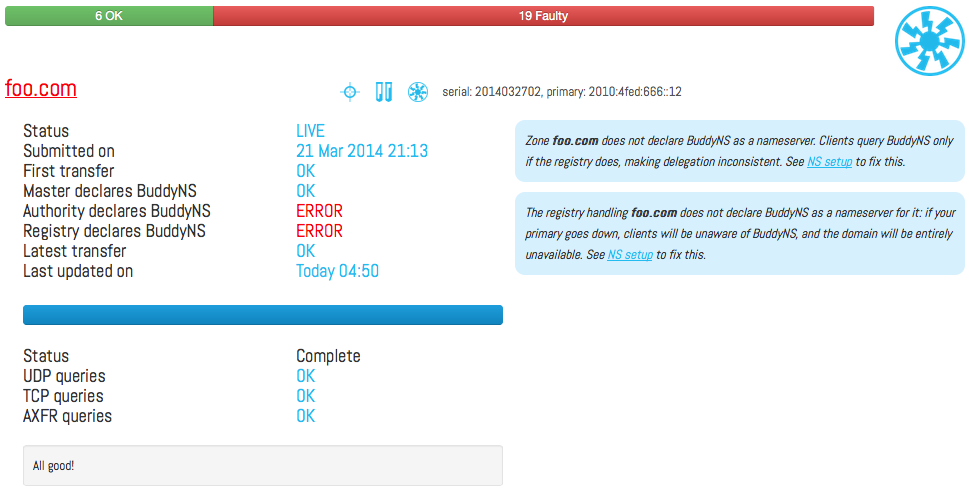
Log into your BuddyBoard. You see 3 indicators for your domain's Delegation Status:
| Test | Situation |
|---|---|
| Master declares BuddyNS | Whether the master/primary server you indicated for this zone responds with any BuddyNS server to NS queries |
| Authority declares BuddyNS | Whether a BuddyNS server shows up when querying the public DNS tree for NS records of this zone. |
| Registry declares BuddyNS | Whether the registry for this zone responds with any BuddyNS server to NS queries.If this |
Other potential issues
| Issue | Description |
|---|---|
| Declares BuddyNS ERROR | Cause: When queried for NS, none of the responses
given by the server refers any *.buddyns.com entry.
This means that, at this server, the zone is not
delegated to BuddyNS. Action: Repeat delegation setup. |
| No response | Cause: The server being contacted has sent no
response. If this is master, you may have a stealth master
configuration that restricts which clients can make queries, or
your AXFR server is not meant to do DNS; This is unusual, but
perfectly fine. Action: If this is registry or authority, this is unexpected, and you may use the Delegation Lab for further troublethoosing. |
Difference Masterand Authority |
Cause: In most of the cases, the declared master is also one of the
delegated NS servers (Authorities) for the zone. In some cases
their values can mismatch. Here's what this indicates:
|
Done!
Once you correctly carried out both
- Zone transfer (the previous step)
- Zone delegation (this step)
... you're good to go! Log into to your BuddyBoard and observe the status of your zones.